


Do you avoid running reports because of the amount of time it takes? Here are two great tips for making this task less burdensome!
Before QuickBooks, summarizing a business's accounting data was a difficult process that could only be accomplished by organizing invoices, bills, and purchase orders and combing through them, calculator--or adding machine--in hand.
Now, one of the top features QuickBooks offers is the ability to run dozens of pre-built report templates with a few clicks. You can further customize these report templates to isolate the exact information you need in tidy, organized rows and columns.
That said, if you don't have a routine established for reviewing your financial information regularly, pulling these reports can take some time! We want you to be able to access critical financial information faster, more frequently, and more efficiently. Let's explore two ways to simplify your reports and make them more useful.
Before We Begin: Using a Sample Company File in QuickBooks Desktop to Practice New Skills
Quick tip: While you're experimenting with reports in this tutorial, you might want to use one of the sample company files that QuickBooks provides, rather than your own live data. To open a sample company file, open the File menu and select Open Previous Company. Click on one of the sample companies listed. You'll follow this same step when it's time to return to your actual company file after this tutorial, selecting your company name from the list.
How to Create Memorized Reports in QuickBooks Desktop
When you first run a report in QuickBooks, how does the software know what set of data to show you? It doesn’t. It just displays a default group of settings. This is your starting point. Open the Reports menu and select Customers & Receivables | A/R Aging Detail. Click Customize Report in the upper left. Change the Display and Filters to reflect your data needs (if you don’t know how to do this, let us help). When you've completed your modifications, click OK to view the report with the new formatting.
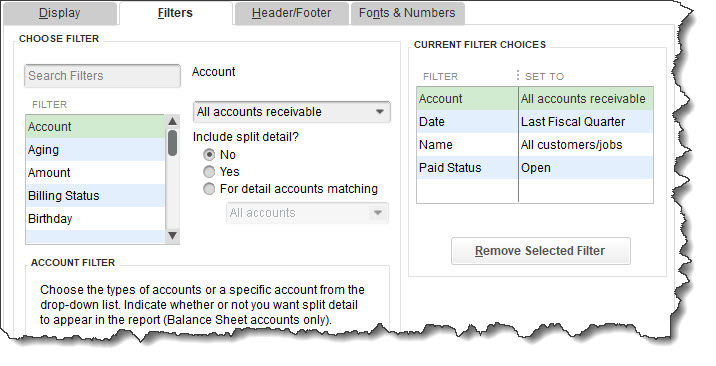
You can customize QuickBooks reports to show only the data you want, then memorize them so you can easily use those settings again.
If the report you've just prepared looks right to you, and this is a report you would like to refer back to regularly, your next step will be to memorize the report. Start by clicking Memorize in the toolbar. In the window that opens, enter a descriptive name you’ll recognize later.
TIP: Naming your memorized reports is critical. You may also want to document what memorized reports you've created and what purpose each of them serves.
Next, you'll be asked if you want to save the report to a group. This step is optional, but go ahead and check that box, and a menu will open, allowing you to choose from Company, Customers, etc. You can also create a custom group such as "Bob's weekly reports" -- many users prefer this approach because they can quickly pull the reports they need on a regular basis. Click OK. In the future, you can find any memorized report by opening the Reports menu and highlighting Memorized Reports. Once you find your report in the list, simply click on it.
How to Leave a Comment On Your Reports in QuickBooks Desktop
As you’re looking at a report, you might want to make some notes about specific line items, either for yourself or to share with others. QuickBooks allows you to do this within the report itself! We'll show you how to add a comment to a report you might likely use this feature on: your Sales by Item Detail report.
Start by navigating to Reports | Sales | Sales by Item Detail. When it opens, click Comment on Report in the toolbar. A second copy will open with a small box next to every element of the report. Hover over one, and a dialogue balloon opens. Click on it, and it turns into a number. At the same time, a rectangular box opens at the bottom of the screen containing that number. Type your comment in and click Save.
You can repeat the process to add any additional notes. They’ll be stacked up at the bottom of the screen. The numbers in this box correspond to the numbers in the report, of course. You can edit them by clicking the pencil icon at the end of the row.
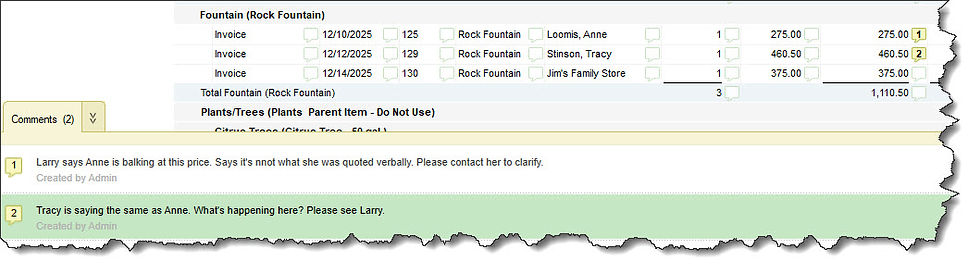
Click next to a report item and type a comment in the box below to save those comments for later.
Click Save in the upper left and give the report a name so you can find it later. You can Print or E-mail these commented reports. Close them when you’re done to get back to the original report. To find one later, go to the Reports menu.
How to Automatically Schedule Reports in QuickBooks Desktop
Now that you've familiarized yourself with memorizing a report in QuickBooks Desktop, your next logical thought might be to schedule those reports to be automatically sent! QuickBooks allows you to automatically email memorized reports to co-workers or other business contacts at specific times and frequencies.
While receiving automatically scheduled reports can be very beneficial, we recommend that you contact us for help setting up this automation. This process is a bit lengthy, and if you use this tool incorrectly, you could wind up emailing the wrong report, sharing sensitive information, or sending information to the wrong recipient.
Getting into a better routine
Hopefully, these instructions can help you get into a better routine of reviewing financial reports. If we can help you determine which memorized reports are right for your business, let us know! We can also assist if you run into any issues with customizing your reports.
And remember, your reporting is only as good as your financial data! If you're looking to establish a more consistent bookkeeping and accounting routine, our tutorial, "5 Things You Should Do Every Time You Open QuickBooks Desktop" is a great place to start!
Comments